
Reading 03
Kerr, C. (2016) Content Designed
Read the following sections:
- The IPPIE Process
- Pages 10 - 11
- Listen to the following audio
Assignments
Reverse Engineer: Social Media Post
Reverse Engineer a Social Media Post
Purpose: Understand the design process Assessment: Quality of analysis
 Content Designed Blog Post. Make sure to post this to the content designed blog, choose relevant categories and tags. Watch this video for instructions.
Initial Post
![]() First due date
First due date
Use Tag: d03aS17
Reverse engineering means to take apart a product or process in order to determine how it was designed, so that you can enhance or duplicate it. Select a social media post with visuals and determine the following:
- What is the main purpose of the ad?
- What are the ad's strengths?
- What are the ad's weaknesses?
- What is the ad trying to accomplish with its design?
- What metrics (likes, shares, re-tweets, etc.) will be used to determine if the ad is successful?
Replies
![]() Second due date
Second due date
Respond to your class mates Facebook posts and leave a comment to at least three classmates posts which adds value. Questions which could be answered:
- Do you agree or disagree? Suggest a source or site that supports your position.
- Did they leave something out? Explain what was missing.
After you have made your comments submit a PDF on ILearn which includes:
- First and Last Name
- Section number
- Professor
- Screen Shot of original post what date and time published clearly visible
- Screen shot of three (expanded) comments from Facebook discussion
Your Personal Manifesto
Purpose:
One of the COMM 315 course objectives is to "create inspiring social media that serves as a light on the hill to shine before men that they will see good works and glorify God." This course objective guides COMM 315 students and instructors, by defining what kind of social media we will create in this course and why. For this assignment, you will write a blog post (you can use any blog platform of your choice, like WordPress or Medium) and define what and why you will participate in social media.
Personal Manifesto:
Create a personal manifesto for the social identity you will be running this semester. Developing a personal manifesto is also like developing a voice statement. It guides how, what, and why you interact on social media.The videos below are examples of personal manifestos. However for this assignment, it's important for you to create your own objectives to guide your social identity you will be running this semester.
To get your juices flowing, watch Jake Parker's video, "What's Your Personal Manifesto?" and Shaun McBride's "Draw My Life: The Shonduras Story." They are both great examples of influencers in different fields talking about why they post and do what they do.
Instructions
Write a blog post which contains your own personal manifesto. The best way to start a personal manifesto is to talk about the what, how and where. The "what" is what you will be talking about. These can be things which passions, things you enjoy doing, things you want to learn, or about you. The "how" is what medium format you will use to connect with your audience. The "where" is what channels you will use.
After you have written and published your blog post, add a link to the coinciding post to your class' FACEBOOK GROUP. You will not be commenting this week on the personal manifestos of your peers so you will immediately submit it to iLearn.
Submit to iLearn
After you have posted your article to our Facebook group, collect a screenshot of your original blog post. Create a PDF to be submitted on ILearn with the following:
- Your First and Last Name
- Professor's Name
- Section Number
- A screenshot of your original blog post
- A screenshot of the comment sharing your manifesto to your facebook group
Gantt Chart Activity
Purpose:
In two weeks, you will be starting on the project portion of the course. Each project will help you develop visual content. Creating quality content which will connect and resonate with your audience takes time and thought. The IPPIE process will help identify, plan, produce, implement and evaluate your projects.
The planning process is an essential part of the IPPIE process and when done correctly will help reduce surprises and hit deadlines. A Gantt chart is a visual graph which is widely used in project management. It shows project activities, tasks or events, displayed against time. On the left of the chart is a list of the activities, and along the top is a suitable timeline. Each activity is represented by a bar. The position and length of the bar reflects the start date, duration and end date of the activity. This allows you to see at a glance:
- What the various activities are
- When each activity begins and ends
- How long each activity is scheduled to last
- Where activities overlap with other activities, and by how much
- The start and end date of the whole project
In this activity, you will create a gantt chart for a new simulated project and submit it on Ilearn. This should help you prepare for the future projects in this course by going through this exercise.
Background and overview:
You have been asked to create an infographic for a new client. However, before you start the project they want to see your production plan. The client wants you to come up with a concept (include this activity within your gantt chart) and use original photography and icons within the graphic. The client also needs this project done within two weeks.
Submit to iLearn
Use whatever program you would like to create the timeline chart. Excel, Illustrator, Indesign, Gantt chart programs are all acceptable. After you have created the chart, produce an image and turn it into iLearn. The image should be high enough quality to see and read all the content produced.
HELPFUL HINT: Your gantt chart should include at least 10 activities for completion. Going above 10 activities shows thoughtfulness and gets your grade above the minimum.
General Submission Instructions
PDF Submissions to iLearn
- Each project page will have a numbered list of items
- Each number should be a page
- Put the pages of your PDF in the same order as the numbered list
The PDF for the final week will be a continuation of the PDF for the draft week. For example, if you have a 5 page PDF for the draft, then the PDF for your final will have those 5 pages and the additional pages.
You may use any software to create this PDF, but please keep the file size down as much as possible (without sacrificing the ability to view the images and screenshots well)
Where to submit
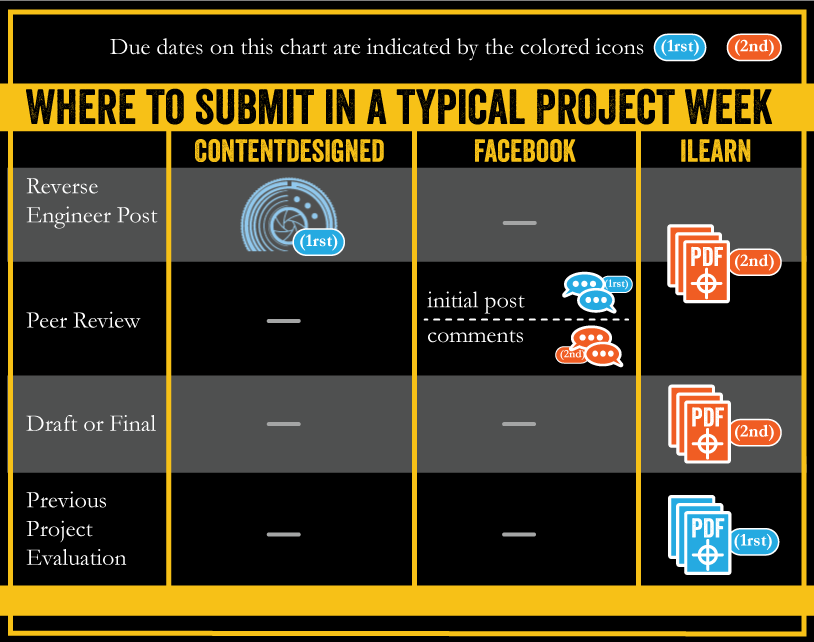
Blog Posts
Each week, you will produce a blog post analyzing some aspect of social media, visual communication or online marketing. Sometimes, you will be given a topic, otherwise, you should choose a relevant topic yourself.
Screenshot your post and add the screenshot(s) to the appropriate PDF to be submitted to the dropbox mentioned in the project instructions.
To ensure that you have good SEO, please review this video, set up your author profile and follow these instructions when creating your blog post.
Facebook Discussions

The following relates to the discussions that will happen in the class facebook group.
Screenshot your initial post, updates, and comments to other students. Add these screenshots to the appropriate PDF to be submitted to the dropbox mentioned in the project instructions.
These critiques will happen on the course facebook page. Each week, a new discussion will start. The primary reason for discussions is to give and receive critique as your continue to share your progress throughout the week.
![]()
- An initial post with your IPPIE process and other items as described in the project instructions
- Include images
- Explain your sketches and concept
- As your project progresses, add additional comments to your post with images of your work
![]()
- Comment on a minimum of three of your classmates’ posts
- Start with classmates’ posts that have fewer comments
- Responses to comments on your own post don’t count
- Respond professionally and be helpful
- Offer critique and feedback
- You may choose to SHOW what you’d change in an image
Blog: Setting up your Author Tag & Creating a Post
Blog: Setting up your Author Tag & Creating a Post
Blog: Wordpress SEO
Blog: Wordpress SEO
Please review the following video to help with your title, tags, categories and featured images on your wordpress posts.