
07
Reverse Engineer an Article Promotion
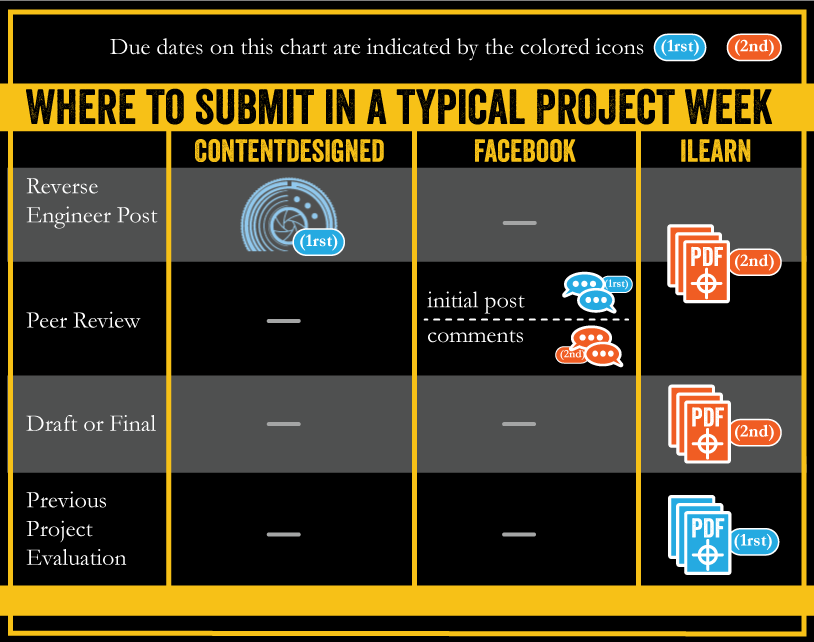
Reverse Engineer Post: An Article Promotion
Instructions: For a reverse engineer post you will go out and find examples of good design. Each REP assignment has a specific type of design your are looking to critique. The post should go into detail to explain the principles of design used. Sketching over top the design will help the user understand the points your are illustrating and are expected.
For this reverse engineer post find a promotion to an article (piece of content) on social media. The article promotion should use an image and good design. Talk about why.
 Content Designed Blog Post. Make sure to post this to the content designed blog, choose relevant categories and tags. Watch this video for instructions.
![]()
Initial Post
Use Tag: d07s16
For the first due date write a post and publish it on the Content Designed Blog. Try and answer the following:
- What are the ad’s strengths?
- What are the ad’s weaknesses?
- What is the ad trying to accomplish with its design?
- How has the design used: Composition, Fundamentals, Contrast, Lines, Layout, Golden Section, Rule of Thirds, Not Half, Swiss Grid or Custom Grids?
- What metrics (likes, shares, re-tweets, etc.) will be used to determine if the ad is successful?
Post your article to the coinciding Facebook post.
![]()
Step 1: Respond to your class mates Facebook posts and leave a comment to at least three which adds value. Questions which could be answered:
- Do you agree or disagree? Possibly suggest a source or site that supports your position.
- Did they leave something out? Explain what was missing.
- Add an additional view point.
Step 2: Put together a multi-page PDF and submit it on ILearn.
What to Submit on iLearn
After you have made comments, you will collect screenshots and create a PDF to be submitted on ILearn with the following:
- Your First and Last Name
- Professor’s Name
- Section Number
- A screen shot of your original blog post
- A link to your original blog post
- A screen shot (from Facebook) of each of the three comments (expanded view) on a classmates post
Brand Identity Project Description
Background
Throughout the semester you will run a brand identity where you will be posting to 2 social media channels regularly. In order to carve out your place on a channel with heavy competition, you need to set your brand apart and we do that by developing a brand's design and style. In this unit, you will create your brand identity and launch it online. You will design a logo, choose colors and fonts, write a voice statement and create a style guide. You will then use original photography to design and brand at least 2 social media channels (not including blogs like Wordpress).
Note:
Everything used for this project must be created during this unit and by you. You may choose to rebrand something, but it must be a COMPLETE rebrand, changing everything except the name of the brand. After the semester, you may choose to delete the pages/profiles if you'd like. While you may do this for a paying client, you MUST have complete creative control and meet all of the project criteria as stated here.
Project aspects
Voice Statement
A voice statement is a short description of the tone or mood of a brand. Every brand should feel like it has a personality; that personality is derived from the voice statement. Describe in 2-3 sentences how the brand should sound and feel like. All of your assets including copy and visuals need to fit this statement.
Logo
Create a logo and name that is unique and easily recognizable. Think iconic. Design something that people would be proud to wear and be associated with. If you'd like, you may create a series of related logos, like surf and skate brands, but this is not required. The logo(s) will be used as the foundational elements of everything else created in this project.
Style Guide
A style guide is a set of rules that help everyone stay "on brand." You will write a simple style guide describing and showing how, where and when design elements should or shouldn't be used. A style guide can be given to any other designer and they will be able to replicate that design's look and feel. The design of the style guide will help another designer know the look and feel of the brand. Therefore, the style guide should look good. The style guide should include description and information on:
- The voice statement
- Audience identification
- This is where you identify who is your primary and secondary audience. You can use statements like, stay at home moms, college students, or teens, and you should avoid general statements like 18 to 55-year-olds. Typically the audience section within a style guide works together with the voice statement.
- The logo
- This is where you identify what to do and not to do with your brand elements. You can also show primary and secondary logo options.
- The brand colors
- The colors identified should show the color scheme selected for the brand. Some brands have different color schemes based on topic, location, sub-brands, and even calls to action color indicators. In this section of the style guide, you will need to identify all colors being used and the CMYK, RGB, and Hex codes.
- The typography
- Brands have a strategy when it comes to typography. They identify at least title/header fonts, and body copy. Sometimes they will have a subheader font as well. When establishing your strategy, indicate what fonts will be used (font name) and where. What size will you typically use the font. The color of the typography, and usually you will have two colors per font, and anything else pertinent.
- Examples of photography
- This is where you will show at least two examples of the type of photography you will use. You need to provide a description of the types of images, subject matter, and if any post processing styles always/shouldn't be used. For example, will you always use the Claredon filter on Instagram.
- Examples of design elements
- Most brands will have other design elements which help support the look and feeling of the brand. Show these examples and talk about how to use them.
You may want to spend a few minutes researching style guides online.
Images
Shoot and edit several images which fit with the voice of your brand. Customers know the difference between stock photography and unique branded photography. The brand voice should be prominent in the unique photography you create. This also is your chance to shoot photography not only for your channels but for any posts/updates you're planning to do this semester. The final images may be mixed media (photo with designed elements) or simply a well composed and touched up photo. Research how different brands use different styles to match their voice in their images (BYU-Idaho, for example, uses attractive students smiling in front of blurred campus buildings)
Branded Social Media Channels
You will be styling at least two social media channels with your brand. Different channels offer different opportunities to promote the voice and visuals of your brand. Each channel should be styled and designed specifically for that channel, but there should be a unified feel from one channel to the next. In other words, don't just use the same image on each channel, but make sure that the brand voice is recognizable on each channel. Research how brands implement their style and voice on different social media channels.
Additional Help
Adobe Illustrator Basics with Workflow & Organizations - https://youtu.be/2R2ZOiCHtWU
Adobe Illustrator Basics - the pen tool & anchor points - https://youtu.be/ovGF2K0gCAc
Project - Evaluation Week
Upload a PDF document that includes the following:
- First and Last Name
- Section, semester and professor
- Screenshots of branding on each channel
- Evaluation of what went well and what could be improved upon (NEW)
Name it firstname_lastname_brand_write_up.pdf
Article Promotion Project Description
Background
Much of what drives traffic and revenue online is the proper promotion of engaging content. The best article that no one knows about doesn't do anyone any good. Conversely, a really solid promotion plan that drives a ton of traffic to garbage content is clickbait and isn't sustainable. The best situation is to create engaging content and a solid promotion plan that drives traffic to that content. In this unit, you will be writing an article and creating visuals to accompany that article.
Remember! A successful campaign uses multiple tweets or posts to promote an article. One tweet or post is not sufficient.
Project Components
Article
The article should be written with a specific message and with an audience in mind. The article should use best practices for online writing including the subject, formatting and length. While there is no specific length for this assignment, it should have enough value to satisfy the reader.
Visuals
The visuals that accompany the article will serve two purposes. First, they will be used in the promotion of the article on social media channels. Second, they will be used in the article to help guide the reader and reinforce or expand the concepts in the article. Due to the different sizes and displaying options of different channels, the visuals may need to be redesigned or reformatted for different channels. The visuals can take any form including, but not limited to, photography, photo manipulation, illustration, design, video, motion graphic, etc or any combination of those.
While there is not a specific number required, when you create more visuals you have more opportunities to promote your content. Remember that this is a Social Media Design course and the visuals will carry significant weight in the grading of this project.
Word lists:
A wordlist is a brainstorming activity to help you create scroll stopping images. Scroll stopping images are needed in today's current seascape to stand out amoungst the floods of content. To create a word list you will:
- Identify 3-5 themes, ideas or concepts from the article.
- Write them on top of the page.
- Under each one, make a list of words or phrases (should be extensive)
- Combine a word from 2 or more lists and see what ideas you come up with to visually represent the combination of those words
A good wordlist should help you combine/create visuals in a new way to encourage your audience to stop themselves from scrolling on social media and check out your content.
Project - Draft Week: Identify & Plan
![]()
Develop the following and post to our Facebook group:
- IPPIE Plan – the first two sections of the IPPIE Process
- Article draft
- Word Lists – view project description to better understand requirements
 #1-3 are due by the FIRST due date as your initial post on the course Facebook group
![]()
Step 1: Respond to your class mates Facebook posts and leave a comment to at least three classmates posts which adds value. Give quality feedback, not just “great stuff” or “this is amazing.” Your feedback should be a critique on the items produced and not on the individual.
Step 2: Put together a multi-page PDF and submit it on ILearn.
What to Submit on iLearn
After you have made comments, you will collect screenshots and create a PDF to be submitted on ILearn with the following:3
- First and Last Name
- Section, semester and professor
- IPPIE Plan – screen shot of your expanded Facebook post comment
- Article draft – screen shot of your expanded Facebook post comment
- Word Lists – screen shot of your expanded Facebook post comment
- A screen shot (from Facebook) of each of the three comments (expanded view) on a classmates post (NEW)
- Finished Article (NEW)
- 15 Visual Sketches or more (NEW)
Name it firstname_lastname_week05.pdf
This PDF is due on the second due date of the draft Week
General Submission Instructions
PDF Submissions to iLearn
- Each project page will have a numbered list of items
- Each number should be a page
- Put the pages of your PDF in the same order as the numbered list
The PDF for the final week will be a continuation of the PDF for the draft week. For example, if you have a 5 page PDF for the draft, then the PDF for your final will have those 5 pages and the additional pages.
You may use any software to create this PDF, but please keep the file size down as much as possible (without sacrificing the ability to view the images and screenshots well)
Where to submit
Blog Posts
Each week, you will produce a blog post analyzing some aspect of social media, visual communication or online marketing. Sometimes, you will be given a topic, otherwise, you should choose a relevant topic yourself.
Screenshot your post and add the screenshot(s) to the appropriate PDF to be submitted to the dropbox mentioned in the project instructions.
To ensure that you have good SEO, please review this video, set up your author profile and follow these instructions when creating your blog post.
Facebook Discussions
The following relates to the discussions that will happen in the class facebook group.
Screenshot your initial post, updates, and comments to other students. Add these screenshots to the appropriate PDF to be submitted to the dropbox mentioned in the project instructions.
These critiques will happen on the course facebook page. Each week, a new discussion will start. The primary reason for discussions is to give and receive critique as your continue to share your progress throughout the week.
![]()
- An initial post with your IPPIE process and other items as described in the project instructions
- Include images
- Explain your sketches and concept
- As your project progresses, add additional comments to your post with images of your work
![]()
- Comment on a minimum of three of your classmates’ posts
- Start with classmates’ posts that have fewer comments
- Responses to comments on your own post don’t count
- Respond professionally and be helpful
- Offer critique and feedback
- You may choose to SHOW what you’d change in an image
Blog: Setting up your Author Tag & Creating a Post
Blog: Setting up your Author Tag & Creating a Post
Blog: Wordpress SEO
Blog: Wordpress SEO
Please review the following video to help with your title, tags, categories and featured images on your wordpress posts.